A-I-DESIGN Organizational Chart
Use Cases
The AI Studio module can be used to:
- transform a personal sketch into a realistic visual or 3D presentation;
- dress a mannequin in a sketched garment;
- apply a fabric, pattern, or texture to a garment;
- create different views of the same product;
- create accessories, backgrounds, or graphic compositions;
- generate multiple concepts from a single idea;
- precisely modify each variation;
- create a cohesive collection based on a project;
- rapidly prepare visuals that would take days to produce using a traditional image editor.
Use Cases
The AI Suggestions Workshop module allows you to:
- quickly search for creative ideas;
- generate proposals for multiple elements of a collection;
- obtain suggestions for garments, accessories, materials, or decorative elements;
- compare different artistic directions;
- create an image library organized by category;
- prepare the visual foundation for a future project;
- transfer a suggestion to the AI Studio for further development or modification;
- accelerate the research, inspiration, and design phases.
Complementarity of the two modules
AI Suggestions Workshop
↓
Idea exploration and rapid generation of proposals
↓
Selection of a promising suggestion
↓
Transfer to AI Studio
↓
Customization, modification, and creation of variations
↓
Project organization and collection creation
↓
Saving the final result
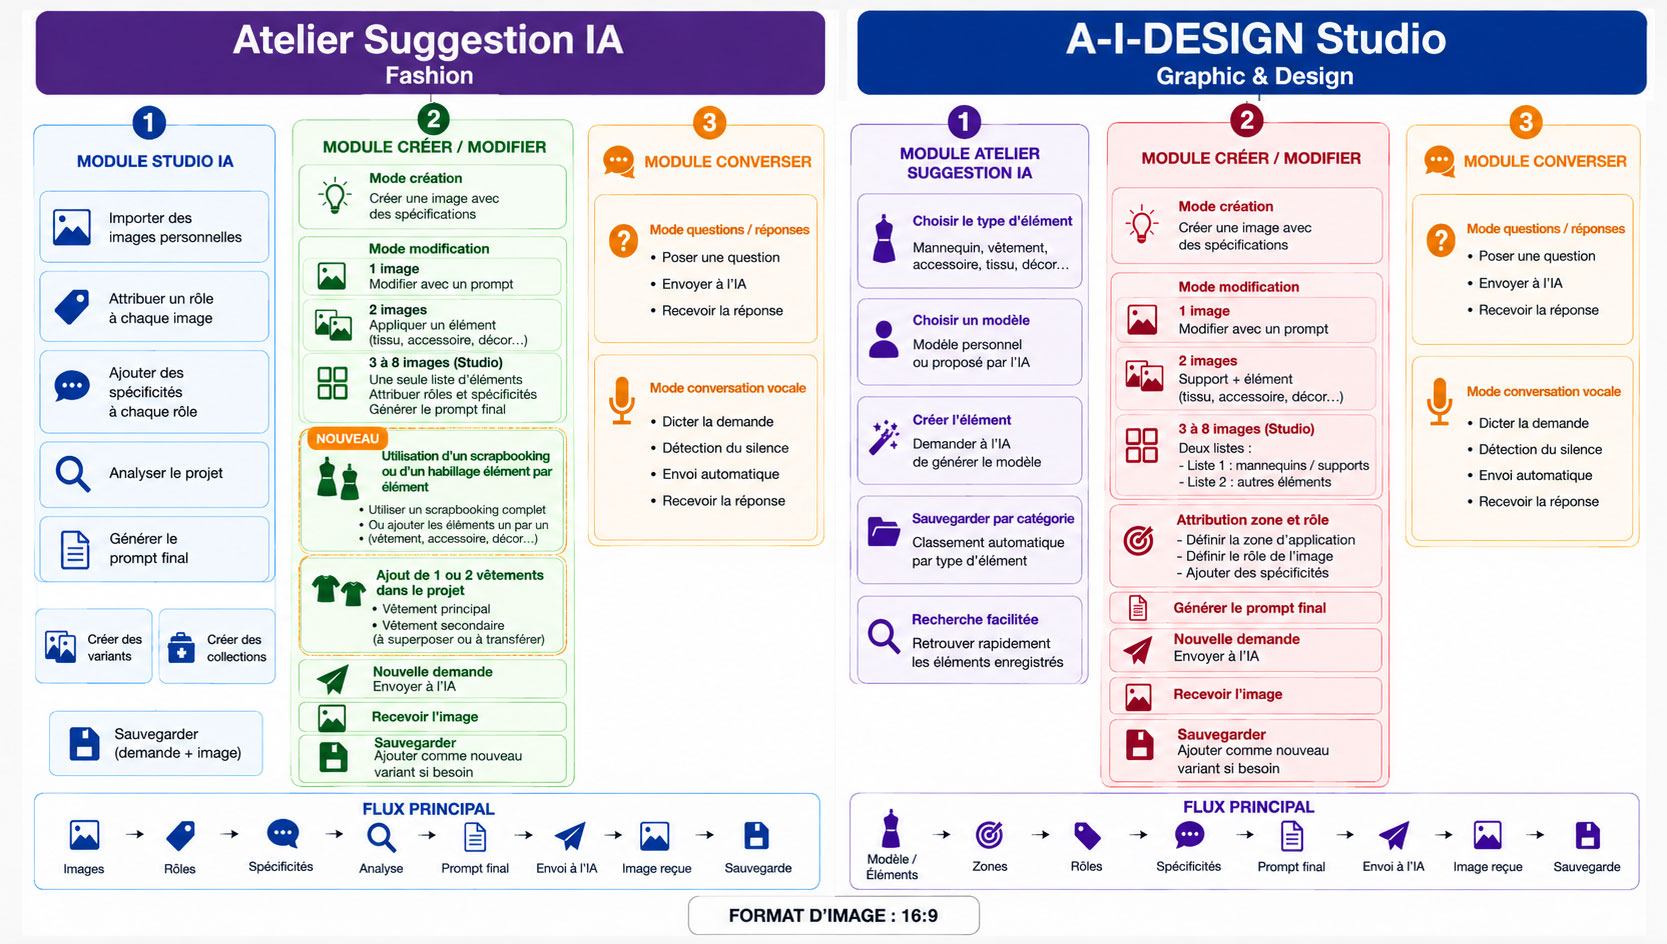
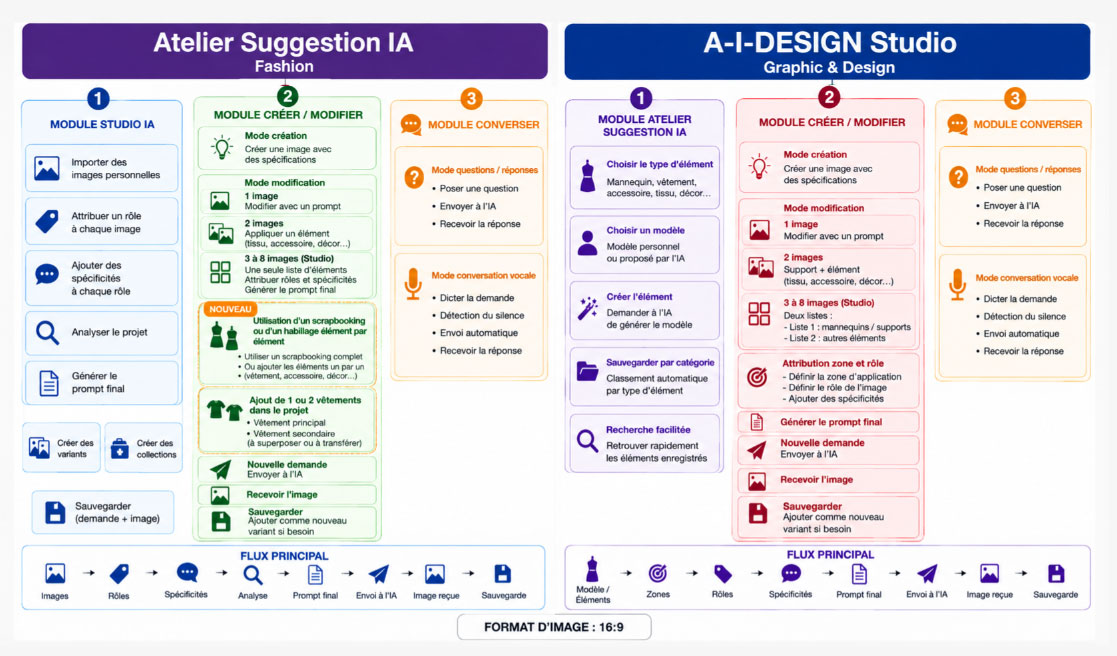
AI SUGGESTION WORKSHOP
│
├── 1. AI SUGGESTION WORKSHOP
│ │
│ ├── Selection of elements to create
│ │ │
│ │ ├── Male model
│ │ ├── Female model
│ │ ├── Dress
│ │ ├── Jacket or blazer
│ │ ├── Skirt
│ │ ├── Trousers
│ │ ├── Top or corset
│ │ ├── Coat
│ │ ├── Bag
│ │ ├── Shoes
│ │ ├── Hat
│ │ ├── Jewelry
│ │ ├── Glasses
│ │ ├── Gloves
│ │ ├── Canvas or fabric
│ │ └── Background / Setting
│ │
│ ├── Selection of the base model
│ │ │
│ │ ├── Use a personal model
│ │ └── Ask the AI to generate a new model
│ │
│ ├── Model usage
│ │ │
│ │ ├── A personal model can be used as the base
│ │ ├── An AI-generated model can be used as the base
│ │ ├── The model may already be dressed or undressed
│ │ └── Garments and accessories are automatically
│ │ adapted and resized to the selected model
│ │
│ └── Automatic classification
│ │
│ ├── Each creation is identified by type
│ ├── The image is saved in the corresponding category
│ ├── Elements are grouped automatically
│ └── Saved elements can be quickly reused
│
├── 2. CREATE / MODIFY
│ │
│ ├── Creation Mode
│ │ │
│ │ ├── Draft a request
│ │ ├── Define the characteristics of the model or element
│ │ ├── Choose style and visual parameters
│ │ ├── Generate the prompt
│ │ └── Send the request to the AI
│ │
│ ├── Modification Mode — 1 Image
│ │ │
│ │ ├── Recall an existing image
│ │ ├── Describe the desired modification
│ │ ├── Preserve selected characteristics if required
│ │ │ ├── Pose
│ │ │ ├── Silhouette
│ │ │ ├── Framing
│ │ │ └── Existing visual identity
│ │ └── Send the request to the AI
│ │
│ ├── Modification Mode — 2 Images
│ │ │
│ │ ├── First image: model, garment or base
│ │ ├── Second image:
│ │ │ ├── Fabric
│ │ │ ├── Canvas
│ │ │ ├── Garment
│ │ │ ├── Accessory
│ │ │ └── Background
│ │ │
│ │ ├── Define the role of each image
│ │ ├── Define the area of application if necessary
│ │ └── Example:
│ │ ├── Apply a fabric to a garment
│ │ ├── Dress a model with a garment
│ │ ├── Add an accessory
│ │ └── Replace or add a background
│ │
│ ├── Studio Mode — 3 to 8 Images
│ │ │
│ │ ├── Open the project
│ │ ├── Display all images used
│ │ │
│ │ ├── List 1: models / main supports
│ │ │
│ │ └── List 2: complementary elements
│ │ │
│ │ ├── Main garment
│ │ ├── Secondary garment
│ │ ├── Accessories
│ │ ├── Canvas
│ │ ├── Fabrics
│ │ ├── Backgrounds
│ │ └── Other visual elements
│ │
│ ├── Dressing Methods
│ │ │
│ │ ├── METHOD 1 — Element-by-Element Dressing
│ │ │ │
│ │ │ ├── Select the model
│ │ │ ├── Add the main garment
│ │ │ ├── Optionally add a secondary garment
│ │ │ ├── Add one or more accessories
│ │ │ ├── Add fabrics, textures or canvas if required
│ │ │ ├── Add a personalized setting or background
│ │ │ └── AI automatically integrates, positions
│ │ │ and resizes all selected elements
│ │ │
│ │ └── METHOD 2 — Scrapbooking-Based Dressing
│ │ │
│ │ ├── Select the model
│ │ ├── Select a scrapbooking image containing
│ │ │ the outfit and its associated elements
│ │ ├── The scrapbooking may contain:
│ │ │ ├── Main garment
│ │ │ ├── Secondary garment
│ │ │ ├── Shoes
│ │ │ ├── Bag
│ │ │ ├── Jewelry
│ │ │ ├── Hat
│ │ │ └── Other accessories
│ │ │
│ │ ├── AI identifies the useful visual elements
│ │ ├── AI adapts them to the model
│ │ ├── AI automatically positions and resizes them
│ │ └── The complete outfit can therefore be created
│ │ from a single visual reference
│ │
│ ├── Using 1 or 2 Garments
│ │ │
│ │ ├── One garment
│ │ │ │
│ │ │ └── Main garment worn by the model
│ │ │
│ │ └── Two garments
│ │ │
│ │ ├── Main garment
│ │ │ └── Primary piece of the outfit
│ │ │
│ │ └── Secondary garment
│ │ └── Additional garment to layer,
│ │ superimpose or transfer onto the outfit
│ │
│ ├── Re-Dressing an Existing Model
│ │ │
│ │ ├── Start from an already dressed or undressed model
│ │ ├── Keep or replace the existing garment
│ │ ├── Add a new main garment
│ │ ├── Add a secondary garment if required
│ │ ├── Add or replace accessories
│ │ └── Use either:
│ │ ├── Individual elements
│ │ └── A complete scrapbooking composition
│ │
│ ├── Assigning an Area and a Role
│ │ │
│ │ ├── Select an image
│ │ ├── Define the target area
│ │ ├── Define its role in the composition
│ │ └── Add specific instructions if required
│ │
│ ├── Possible Roles
│ │ │
│ │ ├── Main model / dominant element
│ │ ├── Main garment
│ │ ├── Secondary garment
│ │ ├── Support
│ │ ├── Texture / fabric
│ │ ├── Accessory
│ │ ├── Background
│ │ ├── Lighting element
│ │ ├── Visual detail
│ │ └── Free element
│ │
│ ├── Example — Dressing a Model
│ │ │
│ │ ├── Image 1: model
│ │ │ ├── Area: global
│ │ │ └── Role: main model
│ │ │
│ │ ├── Image 2: main garment
│ │ │ ├── Area: body / clothing area
│ │ │ └── Role: main garment
│ │ │
│ │ ├── Image 3: secondary garment (optional)
│ │ │ ├── Area: selected clothing area
│ │ │ └── Role: secondary garment
│ │ │
│ │ └── Additional images:
│ │ ├── Shoes
│ │ ├── Bag
│ │ ├── Jewelry
│ │ └── Other accessories
│ │
│ ├── Example — Using a Scrapbooking
│ │ │
│ │ ├── Image 1: model
│ │ │ └── Role: main model
│ │ │
│ │ ├── Image 2: scrapbooking
│ │ │ ├── Contains garment(s) and accessories
│ │ │ └── Role: outfit / visual reference
│ │ │
│ │ └── AI recreates the outfit on the selected model
│ │ while respecting the model's body proportions
│ │ and the visual identity of the supplied elements
│ │
│ ├── Example — Applying a Pattern or Fabric
│ │ │
│ │ ├── Garment image
│ │ │ ├── Area: global or selected clothing area
│ │ │ └── Role: main garment / support
│ │ │
│ │ └── Fabric or pattern image
│ │ ├── Area: top, bottom, collar, sleeve
│ │ │ or selected area
│ │ └── Role: fabric / texture / graphic fill
│ │
│ ├── Preparing the Final Prompt
│ │ │
│ │ ├── Check selected images
│ │ ├── Check the model or main support
│ │ ├── Check main and secondary garments
│ │ ├── Check assigned areas
│ │ ├── Check roles
│ │ ├── Check specific instructions
│ │ ├── Check accessories and background
│ │ └── Automatically generate the final prompt
│ │
│ └── Submission, Saving and Variants
│ │
│ ├── Click "New Request"
│ ├── Send the project to the AI
│ ├── Receive the generated image
│ ├── Review the result
│ ├── Save the image
│ ├── Classify it in the appropriate category
│ │
│ └── If another interpretation is required:
│ ├── Modify the instructions or settings
│ ├── Generate a new image
│ └── Add it as a new variant
│
└── 3. CONVERSATION
│
├── Question / Answer Mode
│ │
│ ├── Write a question or request
│ ├── Send it to the AI
│ └── Receive and display the AI response
│
└── Voice Conversation Mode
│
├── Dictate the request
├── Automatically detect the end of speech
├── Automatically send the request
└── Receive the AI response
FLOWCHART 1
A-I-DESIGN STUDIO (Graphic & Design)
The main distinction between the two environments is as follows:
└── General graphic creation
Combination of images, roles, specifications,
variants, and collections
AI SUGGESTION WORKSHOP
│
└── Fashion-oriented creation
Models, clothing, accessories, fabrics,
application areas, and categorization
The general operation of this first environment can be summarized as follows:
Import images
↓
Assign roles
↓
Add specifications
↓
Analyze the project
↓
Generate the final prompt
↓
Send the request to the AI
↓
Receive the image
↓
Save the result
↓
Create variants or collections
A-I-DESIGN STUDIO
│
├── 1. AI STUDIO
│ │
│ ├── Creating a graphic project
│ │ │
│ │ ├── Import one or more personal images
│ │ ├── Select images required for the project
│ │ ├── Assign a role to each image
│ │ └── Add a specific detail to each role if necessary
│ │
│ ├── Preparing the request
│ │ │
│ │ ├── Check selected images
│ │ ├── Check assigned roles
│ │ ├── Check added specifications
│ │ ├── Launch project analysis
│ │ └── Automatically generate the final prompt
│ │
│ ├── Creating variants
│ │ │
│ │ ├── Select a reference image
│ │ ├── Add a specific request for the variant
│ │ ├── Optionally add an additional personal image
│ │ ├── Generate the new variant
│ │ └── Save the variant to the project
│ │
│ └── Managing collections
│ │
│ ├── Create a collection within the project
│ ├── Group multiple variants
│ ├── Categorize proposals by theme or usage
│ └── Quickly recall a saved collection
│
├── 2. CREATE / EDIT
│ │
│ ├── Creation Mode
│ │ │
│ │ ├── Draft a request
│ │ ├── Define visual specifications
│ │ ├── Choose style, format, and quality
│ │ ├── Generate the prompt
│ │ └── Send the request to the AI
│ │
│ ├── Edit Mode
│ │ │
│ │ ├── Edit a single image
│ │ │ │
│ │ │ ├── Recall an existing image
│ │ │ ├── Describe changes in the prompt
│ │ │ └── Generate the new version
│ │ │
│ │ ├── Edit two images
│ │ │ │
│ │ │ ├── First image: model or base image
│ │ │ ├── Second image: canvas, fabric, accessory, or background
│ │ │ ├── Describe the action to apply to the first image
│ │ │ └── Example: fill a garment with a pattern
│ │ │ or add an accessory to the mannequin
│ │ │
│ │ └── Editing three to eight images — Studio Mode
│ │ │
│ │ ├── Open project details
│ │ ├── Display all project images
│ │ ├── Load images into a single list
│ │ │ │
│ │ │ ├── Bases
│ │ │ ├── Characters
│ │ │ ├── Accessories
│ │ │ ├── Backgrounds
│ │ │ ├── Textures
│ │ │ └── Other graphic elements
│ │ │
│ │ ├── Select each image
│ │ ├── Assign a role to each image
│ │ ├── Optionally enhance the role
│ │ │ │
│ │ │ ├── Reduce the element's size
│ │ │ ├── Modify its color
│ │ │ ├── Modify its position
│ │ │ └── Specify its use in the composition
│ │ │
│ │ └── Generate the final prompt
│ │
│ ├── Final prompt generation
│ │ │
│ │ ├── Automatically lists project images
│ │ ├── Incorporates assigned roles
│ │ ├── Integrates additional specifications
│ │ ├── Structures the request by element
│ │ └── Avoids manual rewriting of all instructions
│ │
│ └── Sending and saving
│ │
│ ├── Review images, roles, and specifications
│ ├── Click "New request"
│ ├── Wait to receive the generated image
│ ├── Click "Save request + image"
│ └── For a new version:
│ │
│ ├── Modify the request
│ ├── Submit a new generation
│ └── Save the image as a new project variant
│
└── 3. CONVERSE
│
├── Question/Answer mode
│ │
│ ├── Type or dictate a question
│ ├── Send the request to the AI
│ └── Wait for and view the answer
│
└── Voice conversation mode